Part 1 of our Dokuwiki tutorial series covered installation and basic wiki page editing. This article will show you how to improve the look and feel by using a new template and creating multi-level navigation. Instead of drilling down one hyperlink at a time, the wiki will have folders that expand and collapse similar to a file explorer.
###Replacing the Default Template
While I think Dokuwiki’s functionality is beautiful, the default page style is ugly. The first thing we’ll do is replace it with something more pleasing. Go to the Dokuwiki page templates section of their website and download the Dokubook template. This layout has a lok and feel similar to Mediawiki.
Editor’s note Dec. 2012: The dokubook template has not been updated in a while. I found that the Monobook template works better.
Unpack the downloaded archive (template-dokubook.tgz) intothe dokuwiki templates directory (lib/tpl):
cd /var/www/dokuwiki
cd lib/tpl
sudo tar xvzf template-dokubook.tgz
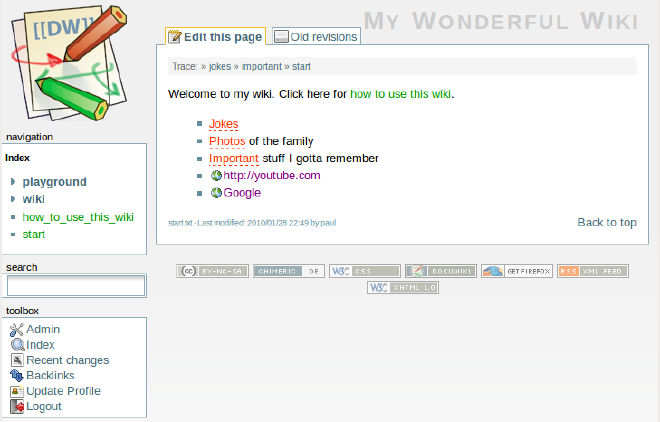
Now we have the template installed, but we haven’t yet told Dokuwiki to use it. Login to your site, click on the Admin button, then the Configuration Settings link. This Configuration Manager page has a long list of settings. In the first section (Basic Settings), change the Template dropdown from “default” to “dokubook”. Click the Save button at the bottom of the page, then navigate back to your start (home) page. Your site should now look like this:

Several things have been added, most of them in a new left-side navigation bar:
- logo in the top left corner. Click on it to jump to the start page.
- index of pages and namespaces. Selecting them jumps to that page or section. Clicking on an arrow expands the namespace to reveal the pages and namespaces at that level.
- toolbox links. Several buttons have been consolidated here that were formerly spread across the top and bottom of the page. There are new links for Recent Changes (across the entire site) and Backlinks (to the current page).
- tabbed notebook replaces buttons for editing the page and viewing old revisions.
###Custom Navigation: The Indexmenu Plugin
The templates system has already enabled us to re-skin the wiki and make it easier to navigate. Let’s take it another step, by adding a plugin. Plugins are any piece of custom PHP code you use to extend Dokuwiki’s functionality.
What’s the difference between a template and a plugin? While templates are used to render each page, plugins are typically employed only when they are called – on the pages where you include them, using a special tag. For example, the blog plugin aggregates a series of pages to create running list of stories. You call it by typing {{blog>.}} on the page.
Dokuwiki lets you install many plugins through its Admin menu – without having to download and decompress them manually. Go to the the
indexmenu plugin page from the
plugins site, where you’ll find hundreds of other plugins. (Remember, you can find links to plugins and other additions by opening the wiki:dokuwiki help pages of your wiki.) Instead of downloading the file directly, just copy the download link to your clipboard. The link can be found by moving the mouse over the puzzle piece image. Using your new Toolbox links in the navigation bar, go to Admin | Manage Plugins. Paste the full URL – including the filename – into the URL text box. Click the Download button. Dokuwiki should take care of the rest, and indexmenu should appear on the list of Installed Plugins below.
The indexmenu plugin will display file folder icons in our index in place of plain vanilla links with arrows. Next, we’ll choose what set of icons to show. From the Toolbox navigation bar, select Admin, followed by a new link called Indexmenu Utilities under a section, “Additional Plugins”. You’ll be shown a list of Themes. The first is your site’s default theme. Click the Show button next to the second one – the URL with the author’s site name. Dokuwiki will connect to the site and show you a preview of the choices. I picked “bj-tango”. You can pick more than one set. Click the Install button next to each one you want to retrieve.
As mentioned above, you typically use a plugin by placing a call to it on a wiki page. The indexmenu plugin, however, is different. It has to be triggered on all of our wiki pages, because we’re always going to show the navigation index. The details can be found on the
indexmenu page. Create a new file called navigation.txt in the root of our wiki documents:
cd /var/www/dokuwiki
cd data/pages
touch navigation.txt
Edit this new file navigation.txt and type one line (replace “bj-tango.png” with the name of your preferred icon.):
{\{indexmenu>..#1|js#bj-tango.png navbar max#3#2}}
###Branding With Your Own Logo
You may want to replace Dokuwiki’s generic logo. No problem. If you installed the dokubook template earlier in this tutorial, change to its images directory and copy your new logo file there, renaming it “logo.jpg” (or “logo.png”, etc. – the filename minus the extension must be “logo”):
cd /var/www/dokuwiki
cd lib/tpl/dokubook/images
sudo cp my-new-image.jpg logo.jpg
If your image is wider than 128 pixels, you’ll probably also want to modify the CSS file (dokubook_design.css) to widen the div container for the navigation bar. But that’s beyond the scope of this tutorial.
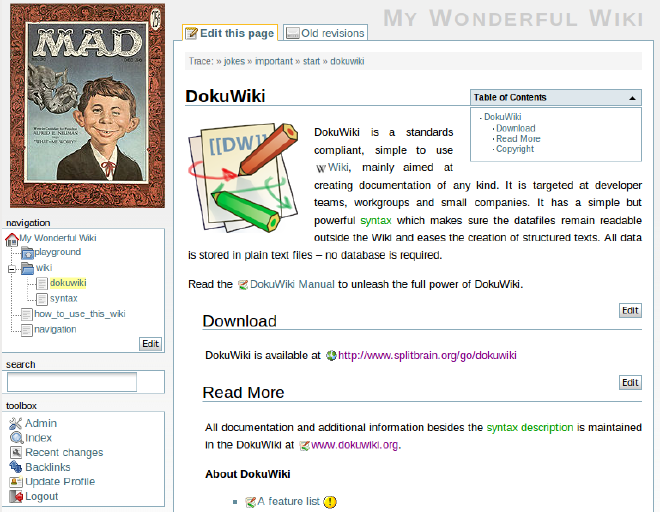
Your site now looks like this (my logo is shamelessly copied from the MAD magazine wikipedia article:

The indexmenu plugin has made a vast improvement in our site. The plugin may not be ideal for a public web site where you want to serve all browsers, not just those with Javascript enabled. For intranets and teams, it can help everyone get comfortable. Your peers will be able to navigate it as naturally as they use Windows Explorer or their local file manager.